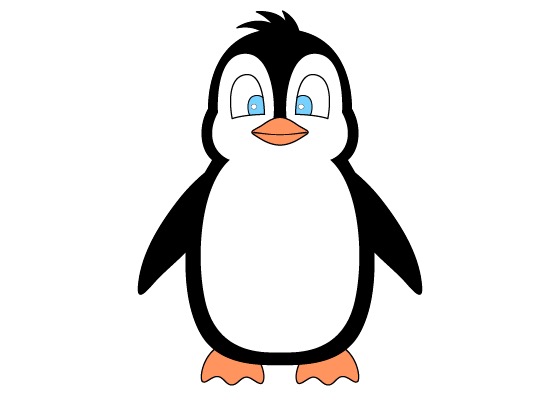
Penguins, renowned for their adorable waddle and striking black-and-white coats, are fascinating creatures. These aquatic birds, while flightless, have adapted impeccably to their marine habitat. Their wings have evolved into powerful flippers, making them agile swimmers in the icy waters of the Southern Hemisphere. Capturing the unique charm of these birds on paper can be a delightful experience. Do you want to draw a penguin? This guide will walk you through a simple process, broken down into manageable steps.
Crafting the Penguin’s Eyes: A Step-by-step Guide
A crucial part of your penguin drawing is the eye formation. Eyes give life to your illustration, and when done correctly, they can make your drawing seem incredibly lifelike. To do this, follow these steps:
Step 1: Lay the Foundation
Begin by sketching two circles of the same size where you want the eyes to be. These circles will serve as the basic shape of the penguin’s eyes.
Step 2: Draw the Pupils
Inside each of these circles, draw a smaller circle. These will be the pupils of your penguin’s eyes. Ensure that they are centered, and their proportion is consistent with the size of the larger circles.
Step 3: Add Depth to the Pupils
Proceed to fill in the smaller circles with a dark color, ideally black, to simulate the pupils. However, remember to leave a small unfilled circle within each pupil.
Step 4: Create Highlights
The tiny white circles you left unfilled will serve as the ‘highlights’ in the penguin’s eyes. These highlights are critical as they add depth and realism to the eyes, giving them a shiny appearance.
The location of these highlights in the pupils is a matter of personal preference, but maintaining consistency in their position across both eyes is key. This symmetry ensures a more realistic look, as it mirrors the way light would reflect off a real penguin’s eyes.
By following this guideline, you will be able to draw compelling and realistic eyes for your penguin. Remember, a successful drawing is all about focusing on the tiny details that collectively contribute to the final product’s overall appearance.
Constructing a Cute Beak: Let’s Do It Right!
After getting the eyes right, the next crucial aspect of your penguin’s face is the beak. Here’s an easy-to-follow guide to help you sketch a beak that seals your penguin’s charm.
Step 1: Position of the Beak
Start by visualizing where the beak should be. The perfect spot is just beneath the eyes and in alignment with them. This positioning gives the face a balanced look.
Step 2: Get the Outline Right
To initiate the sketch, draw a semi-circle turned upside-down in the chosen spot. This shape will serve as the beak’s top outline. Once you’ve drawn this semi-circle, join its ends using a straight line to enhance its shape.
Step 3: Complete the Beak
Proceed to the lower part of the beak. For this, draw another semi-circle beneath the straight line you created earlier. This second semi-circle should be slightly smaller than the first.
Remember, a cute cartoon penguin’s beak should ideally be smaller than its eyes. This proportion is necessary to maintain the cartoon-like appearance and prevent the beak from overwhelming the face.
But remember, it’s your artwork! Feel free to play around with the shape and size of your penguin’s beak until you’re satisfied. The key here is to have fun as you let your creativity loose.
Sketching the Penguin’s Head: Make it Fun and Easy!
The drawing of a penguin is brought to life with the head, which unifies the facial features while adding a visually appealing form. Here’s a systematic guide to sketching a cartoon-style penguin’s head accurately.
Step 1: Begin with the Upper Head
To start, imagine a smooth curve starting from the outer rim of one eye, stretching above both eyes, and descending to the opposite eye’s outer edge. This forms the upper portion of the head. It’s crucial to ensure this line remains unbroken and continuous for a professional look.
Step 2: Creating the Cheeks and Chin
Post creating the top outline, draw a broader curve starting from the endpoint of the previous line. Extend this line beneath the beak, giving a wider berth to create the “chubby” cheeks. This represents the lower part of the head, including the cheeks and chin.
It is essential that the bottom curve is wider than the top one. This is key to achieving the desired “kawaii” or cute look, characterized by chubby cheeks, which are a cardinal trait of cartoon-style drawings.
Tips for drawing a cartoon-style penguin head:
- Maintain smooth and fluid lines for a polished look;
- Ensure the upper and lower lines connect seamlessly at both ends to form a complete head;
- Play around with the extent of the “chubbiness” until you get a satisfactory result.
Adding Sparkle: Outlining the Eyes
One essential aspect that breathes life into a cartoon penguin drawing is the dimensional detail of the eyes. Here’s how to do it right.
Step 1: Eye Outlining
Beginning from the head’s outline near the top of one eye, sketch a gentle curve that runs over the eye and ends at the top edge of the beak. This line will serve as the eyebrow of your adorable penguin.
Repeat the same process with the other eye, ensuring the curve is identical in shape and size for consistency.
These lines will act as the upper boundary of the eyes and add depth to the adorable face of your penguin.
Step 2: Eyelashes for Extra Cuteness
If you want to add a dash of extra cuteness to your penguin, consider sketching little dashes along the curved lines you just drew. These tiny lines will represent eyelashes, enhancing the playful cartoon look of your penguin.
Remember that the beauty of cartoon drawings lies in their imperfections, so don’t fret if the lines aren’t identical or the eyelashes aren’t evenly spaced. The charm lies in the individuality of your creation.
Key tips for eye outlining:
- Ensure your lines are smooth for a polished appearance;
- Consistency in shape and size for both eyes is important for a more authentic look.
Building the Penguin’s Body: Create the Perfect Silhouette
One key characteristic of a penguin is its distinctive body shape. How do you capture this in a cartoon sketch? Let’s guide you through the process!
Step 1: Start with the Larger Oval
Begin by drawing a large oval descending from the lower portion of the head. Make sure the top of the oval slightly overlaps with the penguin’s chin; this imparts a sense of continuity between the head and the body.
Step 2: Insert a Smaller Oval within the Body
Inside this larger oval, draw a smaller oval that aligns with the larger one at the top and tapers down towards the bottom. This smaller oval will represent the penguin’s belly and helps create a sense of depth in your sketch.
When sketching the body, maintain a size roughly double the height of the head. While precise proportions are not necessary, following this general sizing rule can aid in achieving a balanced appearance.
Things to remember when drawing a penguin’s body:
- Ensure that the lines are smooth for a polished look;
- The large and small ovals should align at the top to maintain continuity.
Sketching the Wings: Capture the Penguin’s Grace
Penguins might be flightless birds, but their flippers or wings are crucial for their impressive swimming capabilities. In cartoon drawings, these wings add a charming touch. Here’s how to properly sketch them.
Step 1: Initiating the Wings
Starting at the point where the head and body of your penguin meet, sketch a line that slopes downwards and then subtly curves upwards. The end of this line should be rounded to form the wing’s tip.
Step 2: Completing the Wings
Post creating the wing-tip, draw a gentle line curving back towards the penguin’s body. The resulting shape should resemble a rounded, elongated triangle or a leaf, with the broader end connecting to the body.
Step 3: Repeat for the Second Wing
Once you’ve completed one wing, replicate the same process on the opposite side. It’s essential to keep both wings similar in shape and size to maintain symmetry.
Remember, while penguin wings aren’t large, they shouldn’t be too tiny. Aim for a length roughly the size of the head for a balanced look.
Creating Adorable Feet: Anchoring Your Penguin
No sketch of a penguin is complete without capturing their unique, waddling feet. Here’s how to sketch these essential elements for your cartoon penguin.
Step 1: Start with the Basic Shape
At the base of your penguin’s body on one side, sketch an oval extending outwards at a downward tilt. This oval represents one foot. The angle is crucial, as it adds a sense of motion to your sketch.
Step 2: Duplicate for the Other Foot
On the other side, repeat the same process, ensuring that this foot extends in the opposite direction. This will give your penguin an adorable, waddling stance.
Step 3: Time for the “Toes”
Inside each oval, draw two parallel lines. These lines represent the penguin’s three-pronged “toes,” adding a fun detail to your sketch.
Here are a few tips to keep in mind concerning the feet:
- Aim to keep the feet relatively small in comparison to the body for a balanced look;
- Remember the angle! It adds dynamism to the penguin’s pose.
Drawing a Cartoon Lion
- Face: Begin with a circle for the lion’s face. Inside it, draw two smaller circles for the eyes and fill them in, leaving small white spots for highlights;
- Mane: Around the face circle, draw a larger, fluffy circle to represent the mane. This should be wavy and uneven to mimic the look of fur;
- Nose and Mouth: Below the eyes, draw a small triangle for the nose. Connect the nose to the bottom of the face circle with a line for the mouth. Add a small curved line below the nose for the upper lip;
- Ears: On top of the head, draw two small semi-circles peeking out from the mane for the ears;
- Body: Sketch a simple oval shape beneath the head for the body. It should be proportionate to the head;
- Legs: Draw four simple lines extending from the body for the legs. Add small ovals at the end of each line for the paws;
- Tail: Attach a long, curved line to the back of the body for the tail, with a small tuft of fur at the end.
Each character, with their distinct features, offers a unique drawing experience. The penguin’s round, bubbly form contrasts nicely with the lion’s majestic mane and strong features, providing a diverse range of drawing techniques and styles. Enjoy the process of bringing these cartoon animals to life!
Conclusion
Drawing a cartoon penguin is an exciting endeavor, blending imagination with the reality of these charming birds. Each aspect, from the eyes, beak, body, wings to the feet, contributes to a delightful whole. The joy lies in the process, so remember not to rush. Each new attempt brings you one step closer to perfecting a cute, cartoon penguin. Art is about exploration and enjoyment. So, keep refining your sketching skills, let your imagination run free, and dive into the delightful world of penguins. Happy sketching!