Creating realistic drawings of hair is undeniably one of the most challenging tasks for artists of all skill levels. When it comes to mastering the art of illustrating hair in its many forms – straight, curly, short, long, thick, or thin – the intricacies can be overwhelming. However, imbuing your artwork with well-rendered braids can elevate the overall aesthetic appeal of your creation.
Understanding the nuances of braid drawings is crucial to capturing these complex structures in your artwork. This comprehensive guide will navigate you through these complexities with easy-to-follow instructions and professional advice, helping you to generate flawless braid illustrations with ease.
Whether you are sketching fashion drawings, crafting intricate portraits, or creating dynamic comic book art, this tutorial is designed to enhance your skills and empower your artistic vision.
Unearthing the Beauty of Hair in Art
When depicted expertly, illustrations of hair can exude a breathtaking charm that can portray a spectrum of emotions – from subtle to profound, serene to dynamic. As an artist, brushing up on the nuances of different hair types can significantly enrich your work.
Consider these critical aspects in your depictions of hair:
- Texture Variations: Hair textures are delightfully diverse – from sleek straight to soft waves and bouncy curls. Each texture has its unique attributes that you need to capture deftly;
- Length and Volume Dynamics: The volume and length of hair can influence the overall appearance of your artwork profoundly. Being mindful of these details can enhance the authenticity and appeal of your work;
- Color Intricacies: The color of hair can add incredible depth to your drawings. Employ shading techniques skillfully for different hair colors to bring your art to life.
Redefining Your Braid Illustrations: A Simplified Approach
An effective strategy to tackle the complexity of drawing braids is to strip them down to their basic shapes. This approach allows you to focus on the crucial aspects without getting overwhelmed by the intricate details.
There’s no one-size-fits-all solution in art. The beauty of creativity lies in the freedom to experiment, adapt, and evolve. While you can devise your unique style with practice and exploration, the following four steps can serve as a fundamental blueprint:
- Understanding the Basic Structure;
- Outlining the Braid’s Form;
- Adding Volume and Detail;
- Final Touch-Ups and Shading.
Conceptualize the Flow: Laying the Foundation for Your Braid Drawing
The first step in your journey to capturing the allure of braids is to visualize and establish what can be termed as the ‘line of action’. This fundamental line serves as the guiding path delineating the movement and form of the braid. This step is crucial, regardless of whether the braid appears motionless, cascading down a back, or is dynamically styled.
As Shiela Larson, a renowned artist specializing in Chibi art, suggests, “Even a seemingly stationary braid falling straight down the back necessitates a line of action.” This line introduces a lively fluidity to the braid, preventing it from looking rigidly straight. For instance, when the braid reaches shoulder level, it exhibits a soft curvature. “Breathing life into your braid drawing goes beyond making it fall straight. Lend it some vibrancy,” advises Larson.
An effective starting point for beginner artists can be to sketch a rudimentary shape of a head. This can serve as a reference point to position your braid and understand how it interacts with the body. Remember, the goal is to ensure the braid looks natural and complements the overall image.
Here are some valuable insights to assist you in creating the line of action:
- Visualize the flow of the braid from its origin point, considering how it interacts with the body, and the possible curves it may form;
- It can be helpful to draw light guide lines. Remember, these are just for reference and can be erased later;
- Make sure your line of action complements the overall posture and attitude of the person you’re drawing. A dynamic posture may call for a more dramatic braid flow, while a serene posture may be complemented by a gently falling braid;
- Experiment and practice. The more you practice, the better you’ll understand the nuances of different braids and how to depict them effectively.
Drawing Braids: A Journey of Discovery
Embarking on a journey to draw braids can be both challenging and rewarding. By distilling the complex structure of braids into manageable steps, artists can create compelling and realistic depictions with relative ease. The key is to focus on the fundamentals – from the line of action to the details – and build upon them with practice and perseverance.
This guide provides a comprehensive roadmap for artists, demystifying the process, offering valuable tips and insights, and inspiring them to push their creative boundaries. At the end of the day, the real magic lies in the hands of the artist – in your hands. So pick up your pencil, and let it dance on the canvas, bringing to life the intricate beauty of braids!
Laying the Groundwork: Initiating Braid Drawing with Fundamental Shapes
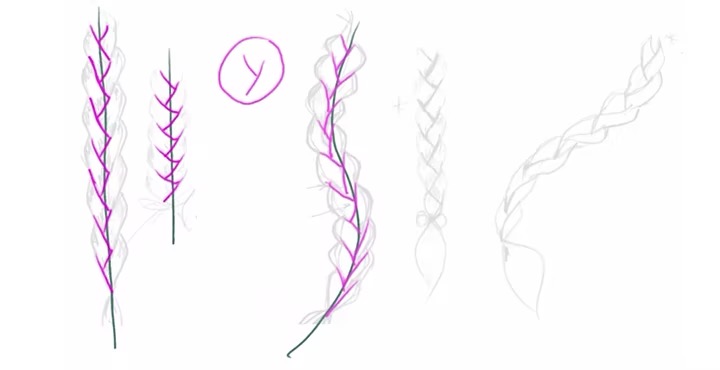
A crucial step to capturing the beauty of braids lies in identifying a recurring shape that could lay the foundation for your drawing. Once recognized, superimpose this pattern onto your line of action to start carving out the basic semblance of the braid.
Fashion Illustrator Josefina Fernandez, renowned for her exquisite artistry, proposes using a recurrent ‘Y’ shape as the basic building block while sketching braids. According to her method, the ends of these ‘Y’s interconnect using a curved, inverted ‘C’ shape, regularly repeated to portray a natural flow.
Alternatively, Shiela Larson, a distinguished artist, offers an exceptional approach of utilizing an alternating ‘Z’ shape as the baseline for her braid illustrations. Closely resembling a zig-zag pattern, each point on this line connects with the usage of the same distinct ‘C’ shape, producing a consistent progression throughout.
Irrespective of the underlying shape that resonates best with your unique artistic style, one essential point to remember while drawing braids is the significance of curved lines. Steer clear from straight lines and harsh angles as they could create an unnatural, rigid feel. “The key lies in avoiding excessively sharp and pointed lines. Unless the braid is exceedingly tight, it is likely to embody a round quality,” advises Larson.
Here are some actionable tips to help you kickstart the braid drawing:
- Start by identifying a basic repeating shape that could serve as the foundation for your braid. It could be a ‘Y’, ‘Z’, or any other shape that you find comfortable to work with;
- Superimpose this shape onto your ‘line of action’. This aims to serve as a skeletal structure, guiding your progress through the braid drawing;
- Pay attention to the flow and curves naturally inherent in braids and aim to replicate them in your drawings;
- Practice and experiment with different shapes until you find the one that best compliments your artistic style.
Finessing the Process: Layering the Details in Braid Drawing
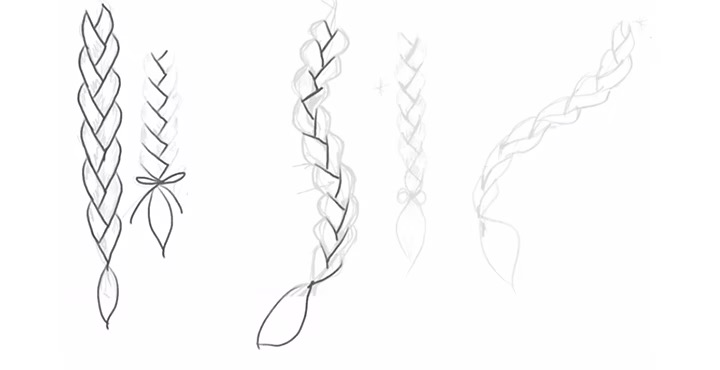
After outlining the base structure of your braid by superimposing the primary shapes onto the ‘line of action’, your next move is to delve into the intricacies. This phase is all about enhancing and refining your drawing with minute details that bring the braid to life. These fine details—individual hair strands, the shine of the hair, tiny loose strands peeping out of the braid—contribute significantly towards creating a realistic braid illustration.
Hannah Simmons, a celebrated visual artist, emphasizes the directionality of hair strands. “The lines that define your hair strands should parallel the actual orientation of the hair in a braid. The strokes should mimic the motion of a brush gliding through the hair,” says Simmons. Similarly, Larson suggests intertwining the strands into one another to portray the route of each strand accurately, highlighting the essence of layering in braid illustration.
In addition, one feature that is often overlooked, yet plays a crucial role in completing the braid drawing, is the end of the braid. “Visualize a tiny band clenching the hair ends together, causing a gentle compression at that point. Post this point, the hair fans out, presenting a fluffier appearance,” explains Larson.
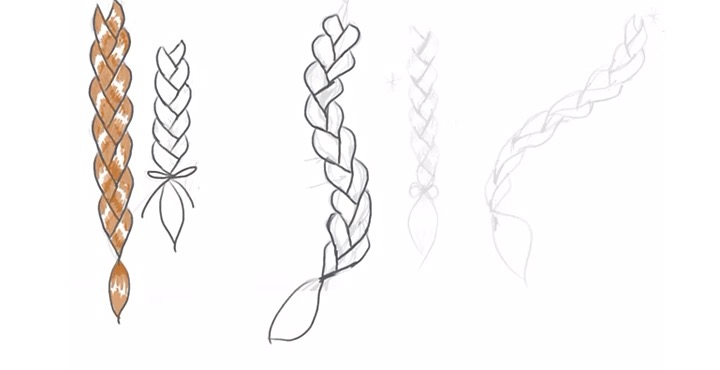
Take note of these key insights while enhancing the details in your braid drawing:
- Ensure your hair strands follow the actual direction of the hair. The strokes should resemble the brushing or combing of the hair;
- Interweave your hair strands into each other. This not only shows the trajectory of each hair strand but also enhances the three-dimensional appearance of the braid;
- Don’t forget the end of the braid. A small band holding the hair together followed by a fanned-out fluff of hair strands adds a realistic finishing touch to your braid drawing.
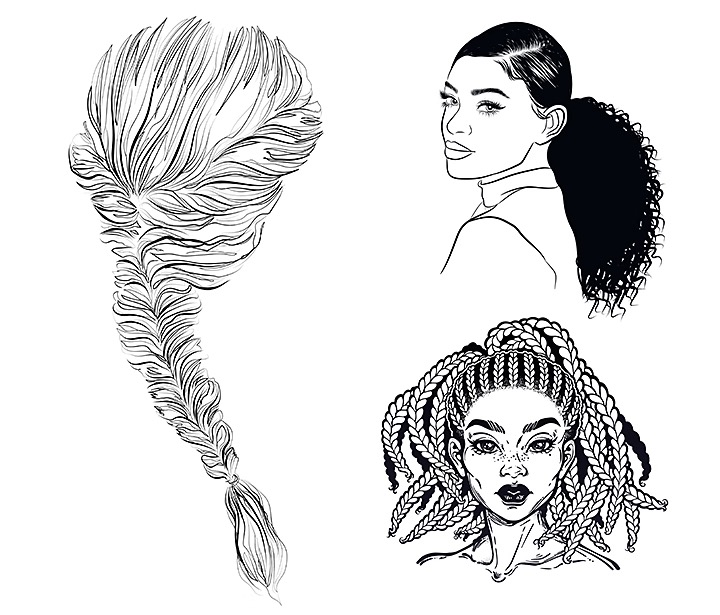
Types of hair
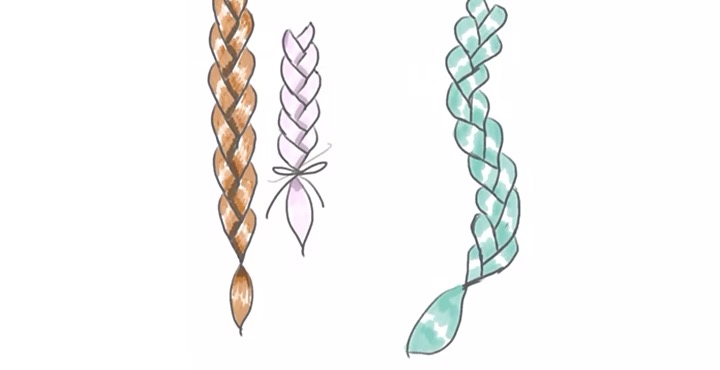
Remember, every head of hair is unique, so your drawing techniques should vary to match the distinct characteristics of each hair type. For example, consider the texture, volume, color, and style differences when drawing braids on people of various ethnicities. Textured braids on a Black person, like cornrows or box braids, will differ from those on a person with smoother hair due to their unique styling and texture.
To portray thick or voluminous hair, use broad strokes to create a sense of fullness. Include individual hairs curling away from the main braid for a natural look, especially if the hair isn’t naturally straight or styled. These small details add realism to your drawings.
Adjust your drawing tools and techniques to reflect different hair textures. Use distinct, sharp lines for coarser hair and smoother, more consistent lines for finer hair. Online tutorials can guide you in drawing various hair textures and braid types.
Drawing Tips for Beginners
For digital artists, work with separate layers for each drawing stage or color. This method allows easy adjustments and layer toggling without damaging your work. Lower the opacity of your base layer, draw over it on a new layer, and keep refining.
Once you’re comfortable with the basics, try experimenting with other braid styles, such as fishtail or French braids. Don’t worry if your initial attempts aren’t perfect. Keep practicing your shapes and shading for more natural results over time.
The Grand Finale
Embarking on a journey to master braid drawing is certainly a thrilling adventure. Every stroke, every curve, and every shade brings you closer to capturing the intricate beauty of braids. This journey fosters valuable skills, nurtures your artistic vision, and offers a refreshing perspective on the timeless beauty of braids.
This comprehensive guide is designed to accompany you throughout your journey, offering a blend of practical techniques, insightful tips, and step-by-step instructions. Regardless of your current skill set or experience level, this guide aims to inspire you to push your creative boundaries and craft stunning, lifelike braid illustrations.
But the real beauty of art lies in its inclusive nature. No matter the technique or approach you adopt, it’s the final creation that speaks volumes and truly reflects your unique vision. So, pick up your drawing tool, let your imagination roam free, and illuminate your canvas with the mesmerizing art of braid drawing. Enjoy the process, experiment, learn, and most importantly, have fun in your artistic journey!